How do I install VilaNet on OpenWrt?
Install the two packages that match your router, then open Network > VilaNet in LuCI to sign in and connect. Back up the router first and confirm its package manager and CPU architecture before downloading anything.
Want the full visual reference? Open the rich VilaNet OpenWrt guide for package-specific instructions, architecture help, screenshots and advanced troubleshooting. This page remains the multilingual safe-start guide.
{% hint style="warning" %} Router changes can interrupt every device on your network. Keep a copy of the router configuration and make sure you can reach LuCI or SSH over the local network before you begin. {% endhint %}
What you need
- A supported OpenWrt or iStoreOS router
- OpenWrt 24.x with
opkg, or OpenWrt 25.x withapk - A configured router root password
- Administrator access to LuCI and SSH
- An active VilaVPN account
- The current VilaNet OpenWrt release
The current public release verified for this guide is v1.0.33.
Back up the router
In LuCI, open System > Backup / Flash Firmware and create a configuration backup. Store the archive somewhere other than the router.
Also record:
- Router model
- OpenWrt version
- CPU architecture
- Whether the router uses
opkgorapk
On an SSH session, these commands show the relevant details:
cat /etc/openwrt_release
command -v opkg || command -v apk
opkg print-architecture 2>/dev/null || apk --print-arch
opkg print-architecture can return more than one line. Use the specific
architecture with the highest priority number; ignore all and noarch for
the core package. For example, prefer aarch64_cortex-a53 over all when it
has the higher priority.
Choose the installation path
| Router | Files | Installation path |
|---|---|---|
| iStoreOS | vilanet-istore-install_1.0.33.run |
iStore > Manual Install |
| OpenWrt 24.x | vilanet-core_1.0.33_<arch>.ipk and luci-app-vilanet_1.0.33_all.ipk |
opkg install |
| OpenWrt 25.x | vilanet-core_1.0.33_<arch>.apk and luci-app-vilanet_1.0.33_noarch.apk |
apk add |
Replace <arch> with the architecture reported by the router. Do not guess based only on the router's marketing name.
Verify OpenWrt 25 downloads
The OpenWrt 25 packages are installed with --allow-untrusted because they are
local release files rather than packages from the router's configured
repository. Verify their SHA-256 values before copying or installing them.
| File | Expected SHA-256 for v1.0.33 |
|---|---|
vilanet-core_1.0.33_aarch64_cortex-a53.apk |
b66dba97bc2c8d3c18eca3556e087651fc9d8ec6d84ebed2ac1d4ab65b03a982 |
vilanet-core_1.0.33_aarch64_generic.apk |
5479c84c8b1373150dd4afd5a337e7e4cfbbcf7109b8c2861e40f979784677b8 |
vilanet-core_1.0.33_arm_arm926ej-s.apk |
5c8c211f9aa9708bab10cdfc80d3171d6f6d6453d0f836927b199f938c5e4569 |
vilanet-core_1.0.33_arm_cortex-a7_neon-vfpv4.apk |
de7425cc9c23cb5f981f78344b75822a11c7624a7033a044bf8eb701415a4d7e |
vilanet-core_1.0.33_mipsel_24kc.apk |
643ff91ca501ef7605146bf3c9e2490a5177ecfdfc5bc9613e48ac4a8b22867d |
vilanet-core_1.0.33_x86_64.apk |
f22fa045b777677a647da808110eb00af8ad661bafeb07b48aae13e7ff6187c4 |
luci-app-vilanet_1.0.33_noarch.apk |
201782ccebba81d170ed7193ca75aee8e46fe9d542fa4992dc7222960dc04502 |
On macOS, run shasum -a 256 <filename>. On Linux or the router, run
sha256sum <filename>. If either value differs, do not install the files.
Install on iStoreOS
- Download
vilanet-istore-install_1.0.33.runfrom the current release. - Open the iStoreOS web interface.
- Go to iStore > Manual Install.
- Upload the
.runinstaller. - Review the installation result before leaving the page.
- Open Network > VilaNet.
Install on OpenWrt 24.x
Download the matching core IPK and the architecture-independent LuCI IPK. Copy them to the router:
scp -O vilanet-core_1.0.33_<arch>.ipk root@<router>:/tmp/
scp -O luci-app-vilanet_1.0.33_all.ipk root@<router>:/tmp/
Install both packages over SSH:
opkg install /tmp/vilanet-core_1.0.33_<arch>.ipk \
  /tmp/luci-app-vilanet_1.0.33_all.ipk
/etc/init.d/vilanet enable
vilanet version
Install on OpenWrt 25.x
Download the matching core APK and the noarch LuCI APK. Copy them to the router:
scp -O vilanet-core_1.0.33_<arch>.apk root@<router>:/tmp/
scp -O luci-app-vilanet_1.0.33_noarch.apk root@<router>:/tmp/
Install both packages over SSH:
apk add --allow-untrusted --force-non-repository \
  /tmp/vilanet-core_1.0.33_<arch>.apk \
  /tmp/luci-app-vilanet_1.0.33_noarch.apk
/etc/init.d/vilanet enable
vilanet version
Sign in and connect
- Refresh LuCI after installation.
- Open Network > VilaNet.
- On Overview, enter the email address and password for your VilaVPN account.
- Select Login.
- Open Servers and select a location, or leave selection on the automatic option when available.
- Return to Overview and select Connect.
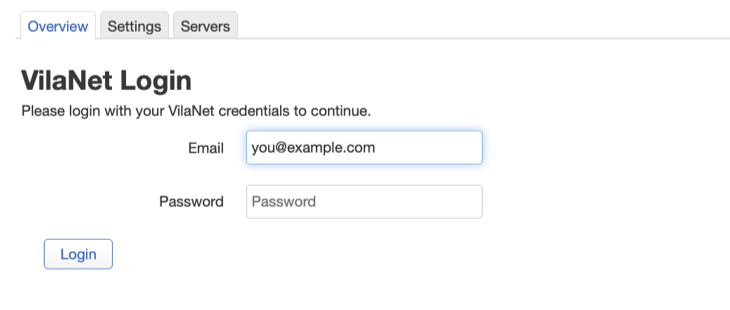
This real LuCI capture uses the reserved example address you@example.com and
an empty password field. The wide router screen was cropped to keep the login
controls legible on a phone; no interface elements were reconstructed.
Physical-router screenshots and a LAN traffic check remain the publication evidence gate; a connected label alone is never tunnel proof.
Confirm it works
Check the router first:
vilanet version
vilanet status --json
/etc/init.d/vilanet status
logread | grep vilanet
Then use a device connected to the router:
- Open a normal HTTPS website.
- Return to Network > VilaNet > Overview.
- Confirm that the service remains running and the connection remains connected.
A connected label alone is not enough. Router status and traffic from a LAN device must both work.
If the VilaNet menu is missing
- Hard-refresh the LuCI page.
- Run
/etc/init.d/rpcd restartover SSH. - Reopen LuCI and check Network > VilaNet.
- Confirm both the core and LuCI packages are installed.
If VilaNet starts and then stops
Preserve the evidence before reinstalling:
vilanet version
vilanet status --json
/etc/init.d/vilanet status
logread | grep vilanet
Include the router model, OpenWrt version, package manager and the redacted output when contacting support. Do not send your password or raw subscription data.
Unsupported old installer
The old vilanet-test-*.tar.gz manual-copy method is retired. Use the current IPK, APK or iStoreOS installer from the official release.
Next step
Read Recovery and rollback before changing routing mode, upgrading packages or removing VilaNet.
Was this page helpful?