How do I install and use VilaNet on macOS?
Install VilaNet from the Mac App Store or the official universal DMG, sign in with your VilaVPN account and choose Auto Select. The App Store build uses TUN mode and asks for macOS VPN approval; the DMG starts in Proxy Mode and does not ask unless you switch to TUN Mode.
The VilaNet 2.12.82 download, shared app labels and macOS 12 minimum version have been checked against the current release and application source. The installer, permission prompts and real VPN tunnel still require final verification on clean Intel and Apple silicon Macs before publication.
Before you start
You need:
- macOS 12 Monterey or later;
- an Intel or Apple silicon Mac;
- an active VilaVPN account; and
- permission to install applications and approve VPN changes on the Mac.
1. Download VilaNet
Choose one official source:
- Mac App Store: Get VilaNet from Apple. This is the simplest installation method and supports App Store updates.
- Universal DMG: Download VilaNet 2.12.82 for macOS. The same file supports Intel and Apple silicon Macs.
You can also reach current downloads through the VilaVPN downloads page or review the files on the public VilaNet 2.12.82 release page.
Do not install a copy received through an unsolicited message or an unofficial download site.
2. Install the app
Mac App Store
- On the VilaNet App Store page, select Get or the download button.
- Complete Apple's confirmation if requested.
- When installation finishes, select Open.
Universal DMG
- Open
VilaNet-for-macOS-2.12.82.dmgfrom Downloads. - In the installer window, drag VilaNet to Applications.
- Eject the VilaNet disk image.
- Open Applications, then open VilaNet.
- If macOS asks whether to open an app downloaded from the internet, confirm only when the app name and download source match this guide.
3. Sign in
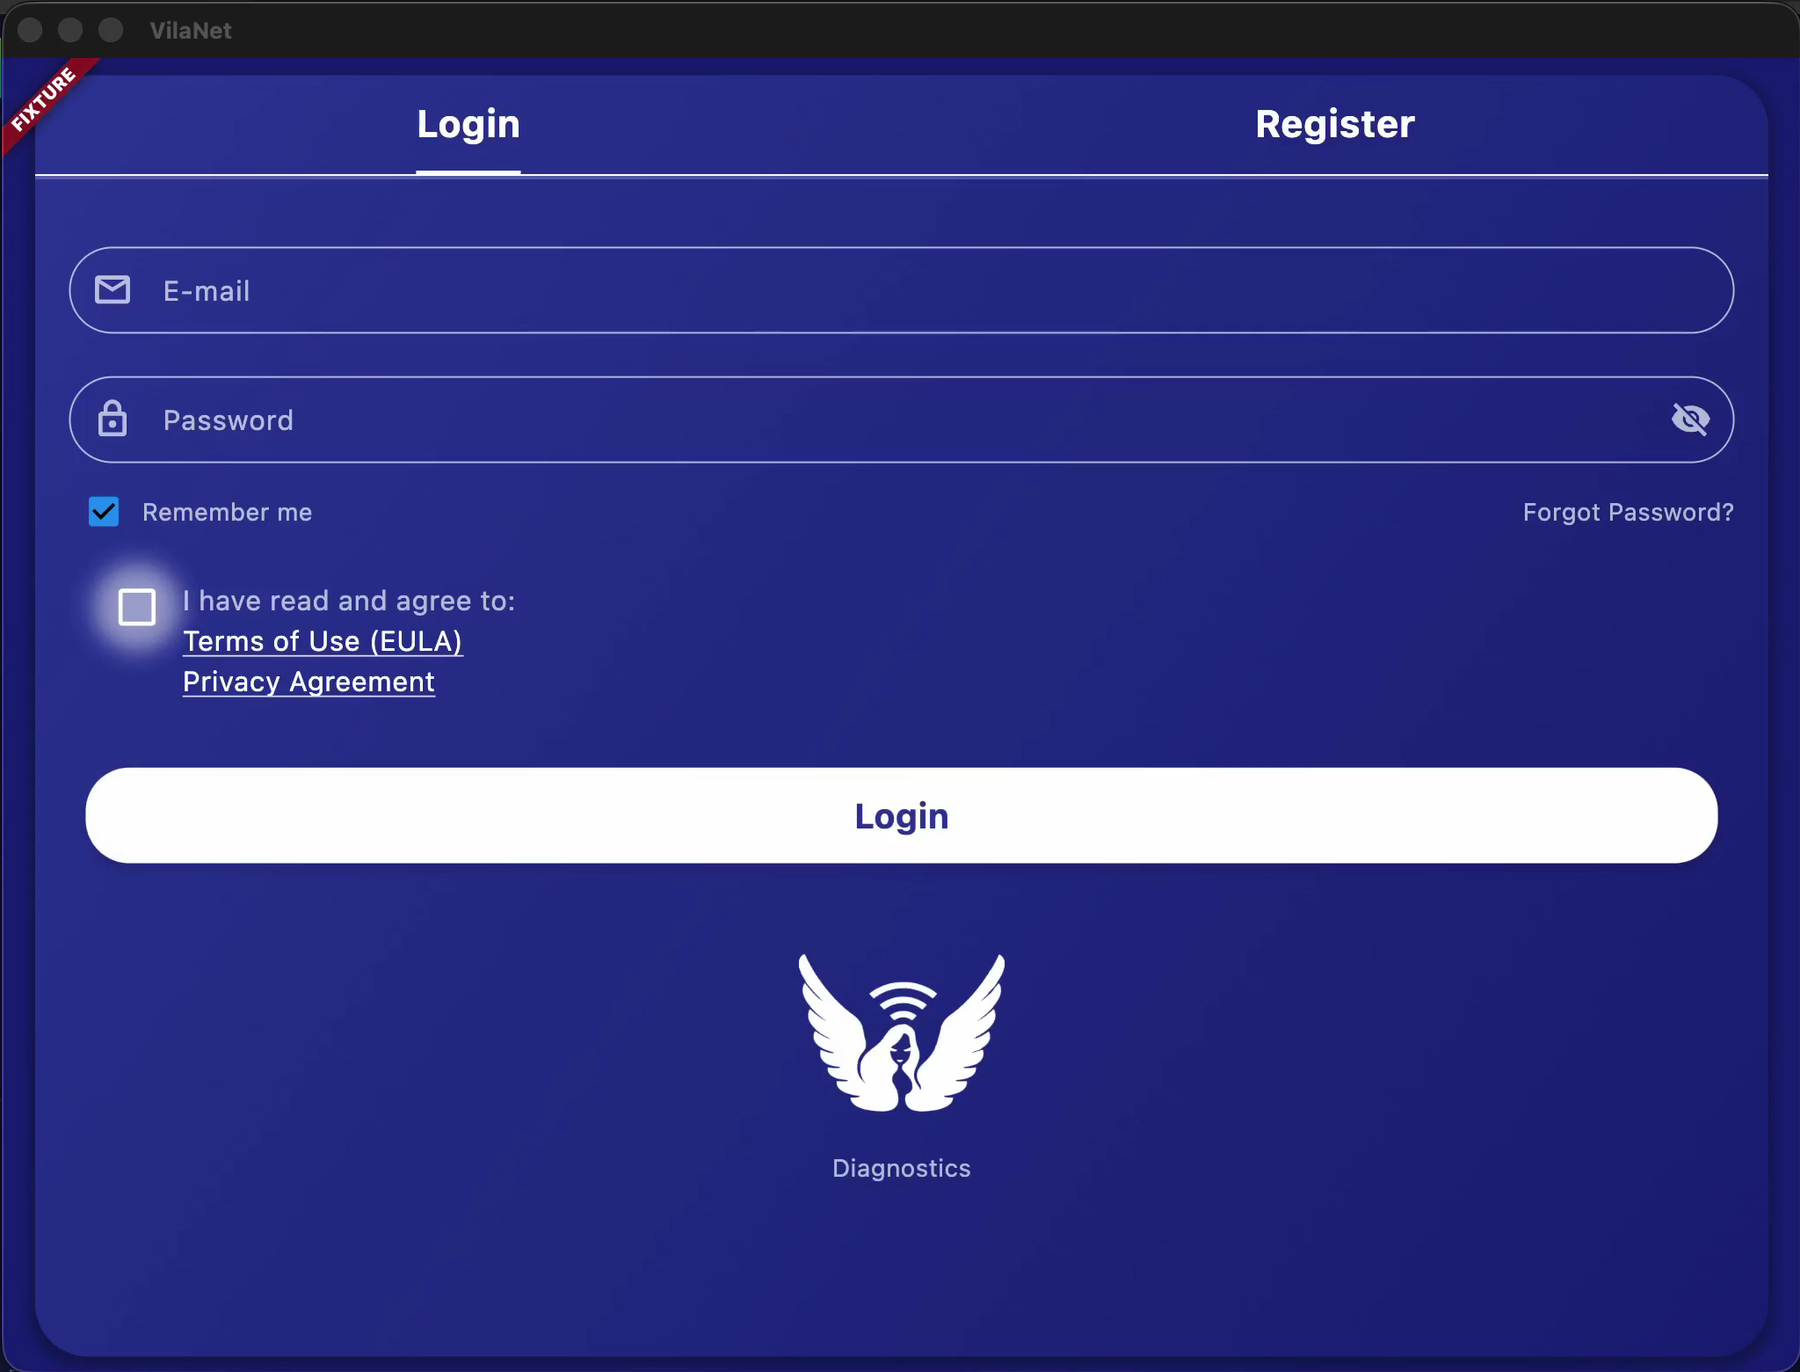
- Open VilaNet. It opens on the Login tab (Register is the tab beside it).
- Enter your VilaVPN account email in the E-mail field.
- Enter your account password in the Password field. It is always shown as dots; the eye icon on the right toggles it.
- Select the I have read and agree to: checkbox — the Terms of Use (EULA) and Privacy Agreement links sit directly under it and are worth reading first. Ticking the box immediately opens the data-consent dialog Allow minimal data to provide VPN service?.
- Review the message. Select the blue Allow if you agree and want to continue.
- Select the white Login button.
Remember me is ticked by default.
VilaNet should open the main screen. An expired or inactive package must be renewed before it can connect.
Sign-in recording and step-by-step screenshots
The sign-in screen is the same interface on Windows, macOS, Linux, Android and iOS. The recording
and screenshots below come from the English interface of VilaNet v2.14.6 (core
1.13.14-cc9ce62ff).
This recording and these screenshots come from an official demo session marked FIXTURE: the account (
tutorial-user@example.com), nodes, latency, data usage and IP are all example data, the password is only ever shown as dots, and no real server is contacted while filming. The on-screen wording and the steps match the VilaNet you installed.
What the login screen looks like. Login and Register tabs at the top; the E-mail and Password fields in the middle; below them the already-ticked Remember me and, on the right, Forgot Password?; then the I have read and agree to: checkbox with the Terms of Use (EULA) and Privacy Agreement links; and at the bottom the white Login button, the wing logo and a Diagnostics link.
The data-consent dialog that ticking the agreement opens. It is titled Allow minimal data to provide VPN service? and lists what is sent (account credentials, device model and OS version, VPN errors only, crash logs) as well as what is explicitly not logged or sent (browsing history, DNS queries, IP addresses after VPN connection, traffic content). At the bottom are a blue Allow and a red-outlined Don't Allow; the recording chooses Allow.
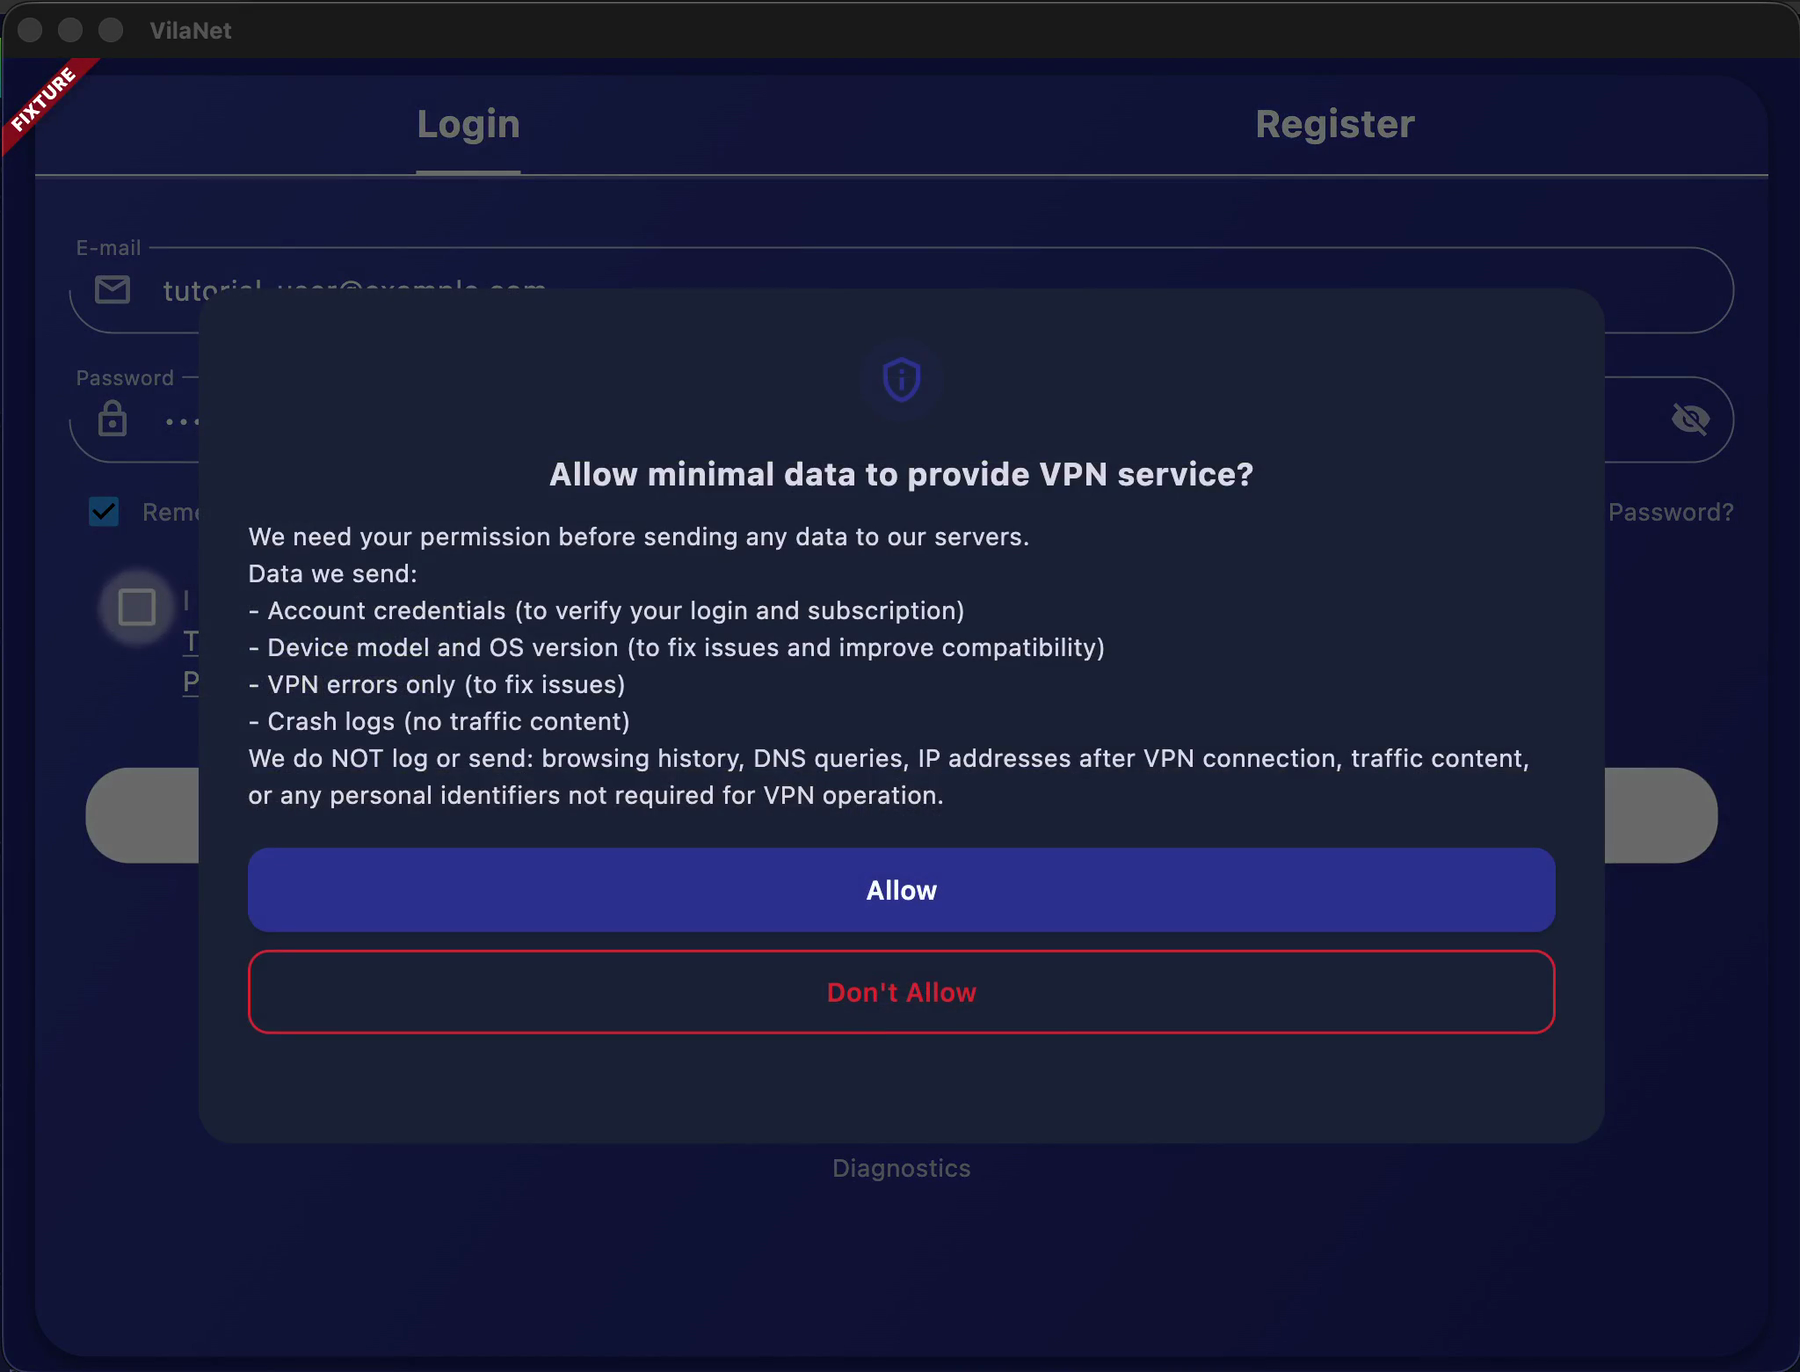
This dialog is opened by ticking the agreement checkbox — it is not a login failure. Choosing Allow closes it and returns you to the filled-in form with the agreement now ticked, ready for Login.
4. Choose a server and connect
The connection controls are shared with the other VilaNet apps.
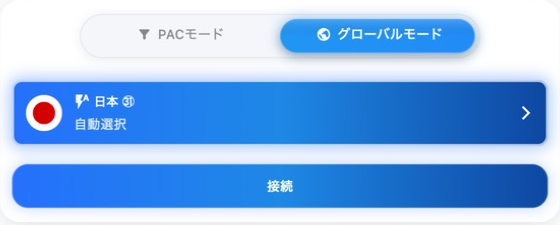
This is a real VilaNet 2.12.52 capture on macOS 26.3.1, resized to a 600 x 700
window before capture. The app locale is Japanese: 自動選択 means Auto
Select and 接続 means Connect. The written guide remains scoped to the
current 2.12.82 release; the accepted screenshot-version difference is recorded
in the image register.
- Open Server Nodes.
- Choose Auto Select for the fastest available server, unless you need a specific location.
- Return to the main screen.
- Select Connect.
- If you installed from the DMG and remain in its default Proxy Mode, no VPN or system-extension prompt is expected. Continue to step 8.
- In TUN mode, review any macOS prompt that names VilaNet and asks to add a VPN configuration or activate its VPN component, then approve it.
- If macOS opens system settings, approve the VilaNet system extension in the
location shown for your version:
- macOS 13 through 15: System Settings > Privacy & Security;
- macOS 26 or later: System Settings > General > Login Items & Extensions; or
- macOS 12: System Preferences > Security & Privacy > General.
- Return to VilaNet if necessary and select Connect again.
- Wait for Connecting to change to Connected.
The macOS VPN approval prompt in step 6 looks roughly like this:
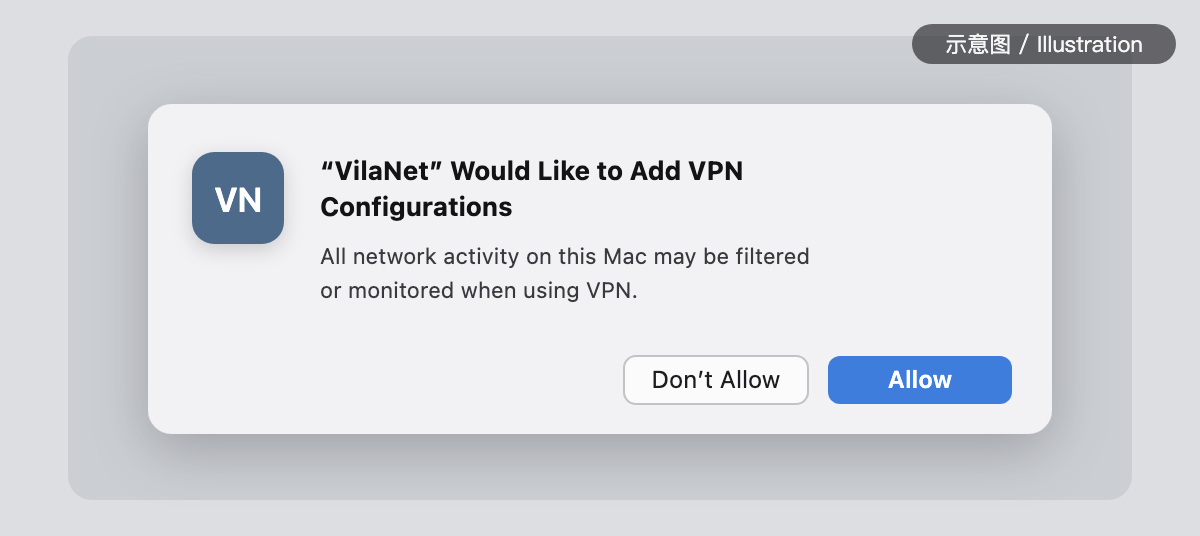
Illustration — actual wording may vary by OS version. This is a hand-drawn illustration, not a screenshot; it only shows what kind of prompt to expect. Approve only a prompt that names VilaNet.
The system-extension approval in step 7 appears in system settings, not in this dialog, and is not illustrated here.
Choose Proxy Mode or TUN Mode
The direct DMG build can use Proxy Mode for HTTP/SOCKS proxying or TUN Mode for a system-level VPN tunnel. Open Settings, review Connection Mode, and choose the mode required by your setup. TUN Mode can trigger the macOS approval described above.
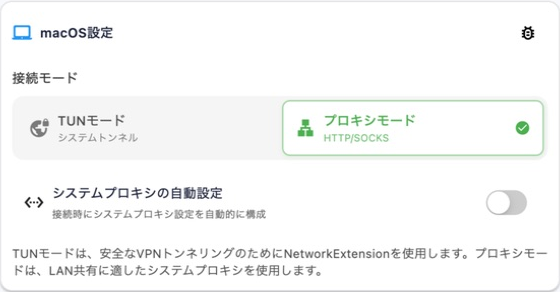
In this Japanese capture, TUNモード is TUN Mode and プロキシモード is
Proxy Mode. It is a privacy-safe crop of the real settings screen; account,
package, public-IP and local-proxy details are outside the image.
Do not approve a system or administrator prompt that names an unrelated app.
Connect-flow recording and step-by-step screenshots
After you sign in, the connect flow is the same interface on Windows, macOS, Linux, Android and iOS.
The recording and screenshots below come from the English interface of VilaNet v2.14.6
(core 1.13.14-cc9ce62ff).
This recording and these screenshots come from an official demo session marked FIXTURE: the account, nodes, latency, data usage and IP are all example data (for example
IP Address: 203.0.113.1), and no real server is contacted while filming. The on-screen wording and the steps match the VilaNet you installed; whether a connection is actually established is shown by the status on your own device.
Open the main page. The card in the middle shows the status Disconnected, the connection-mode button TUN Mode and IP Address. Below it are the Pac Mode / Global Mode switch, the current server card and a blue Connect button. The left rail holds Main Page, Servers, Settings, Invoices, Support Tickets, Announcements and Check Updates.
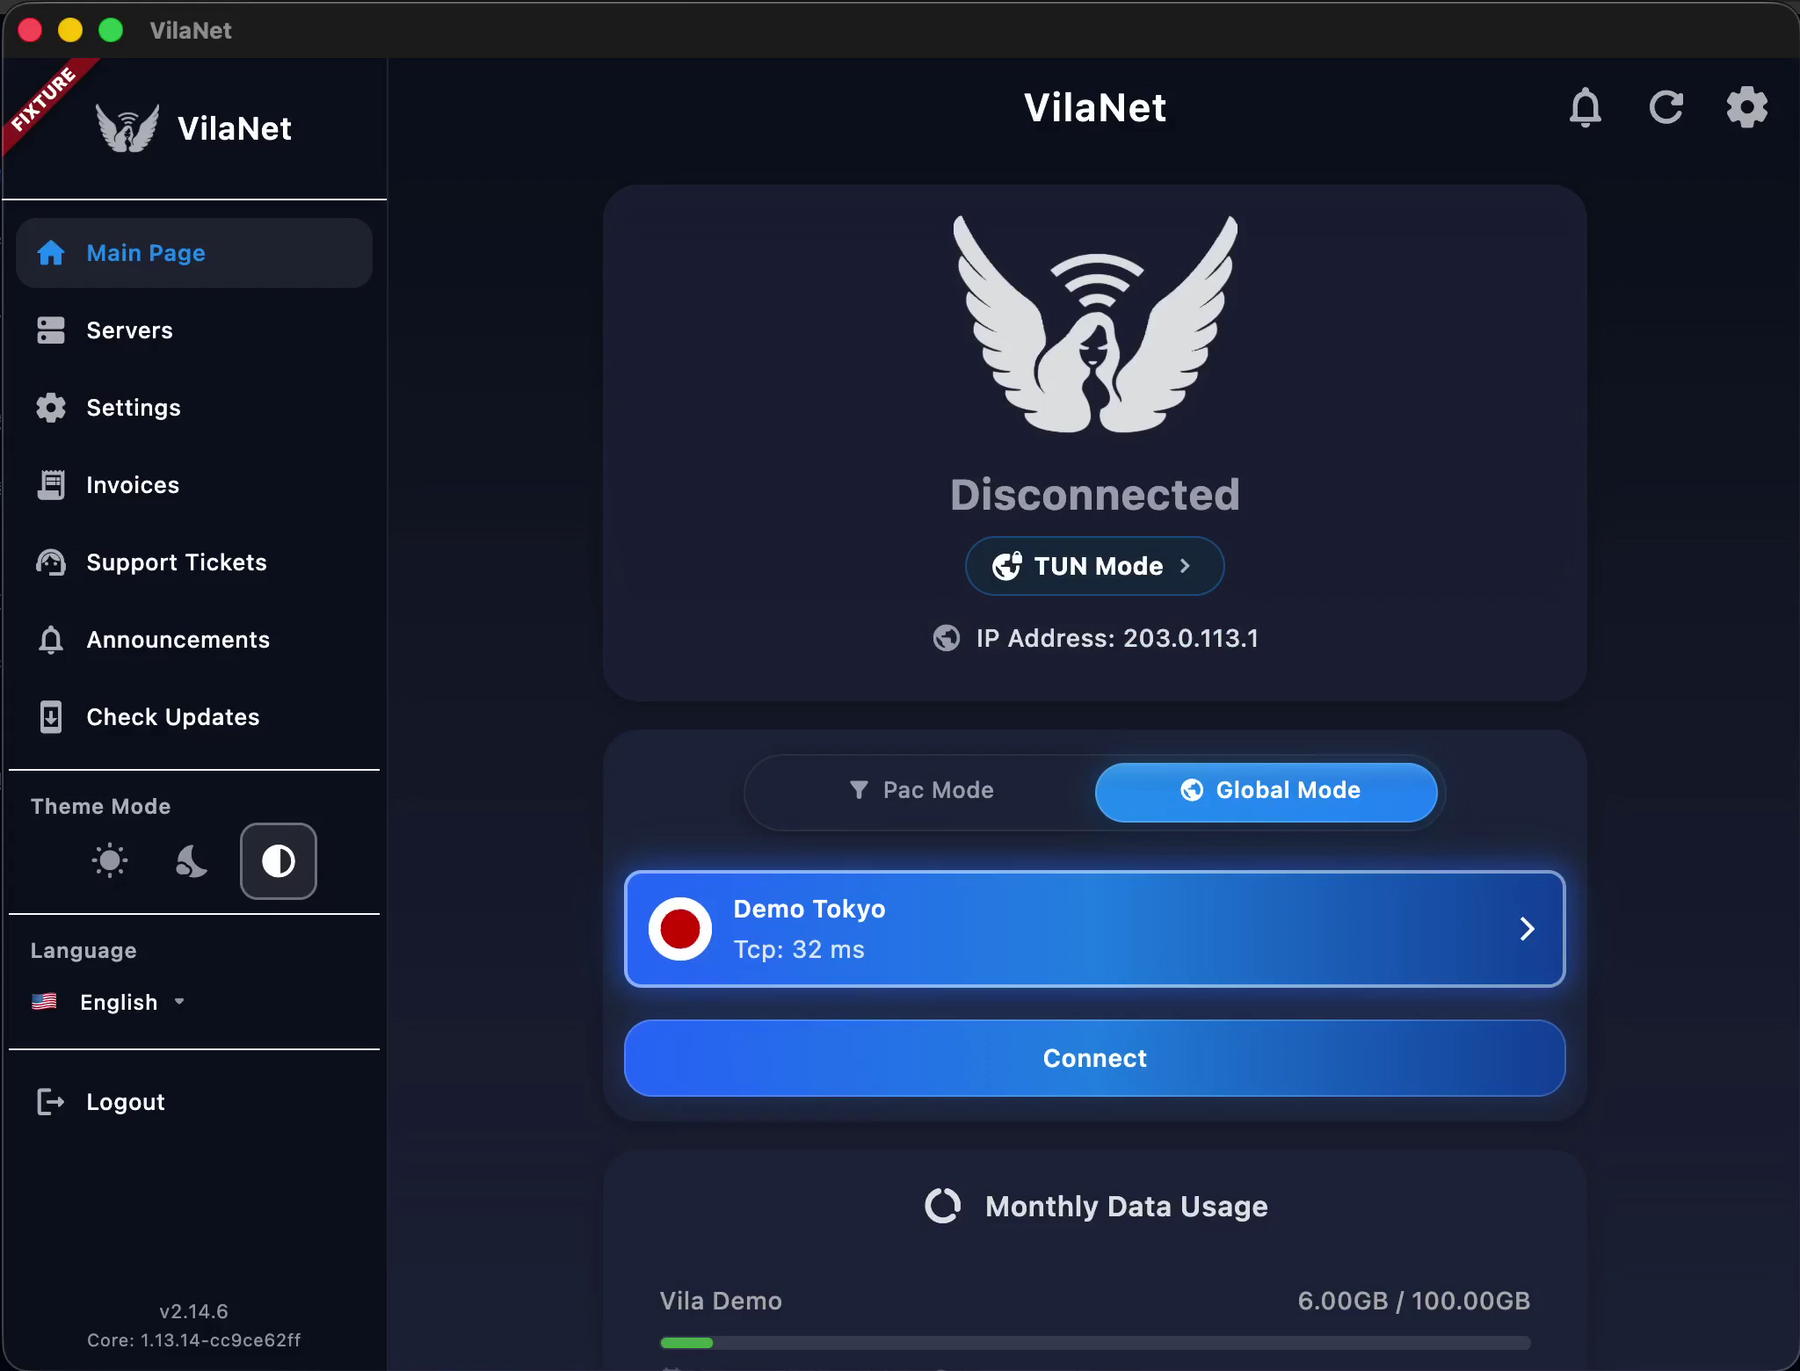
Click the current server card (here
Demo Tokyo, second lineTcp: 32 ms) to open the Server Nodes page. The top of that page shows your current package (hereVila Demo) and a Change control.Expand the group you want. Auto-Select (3) is expanded by default and holds Fastest, Japan and Singapore, each labelled Auto Select. The protocol groups (for example AnyTLS (2)) are collapsed by default — click the group header to expand one. Once expanded, nodes are listed under country sub-headings, each showing its name and latency.
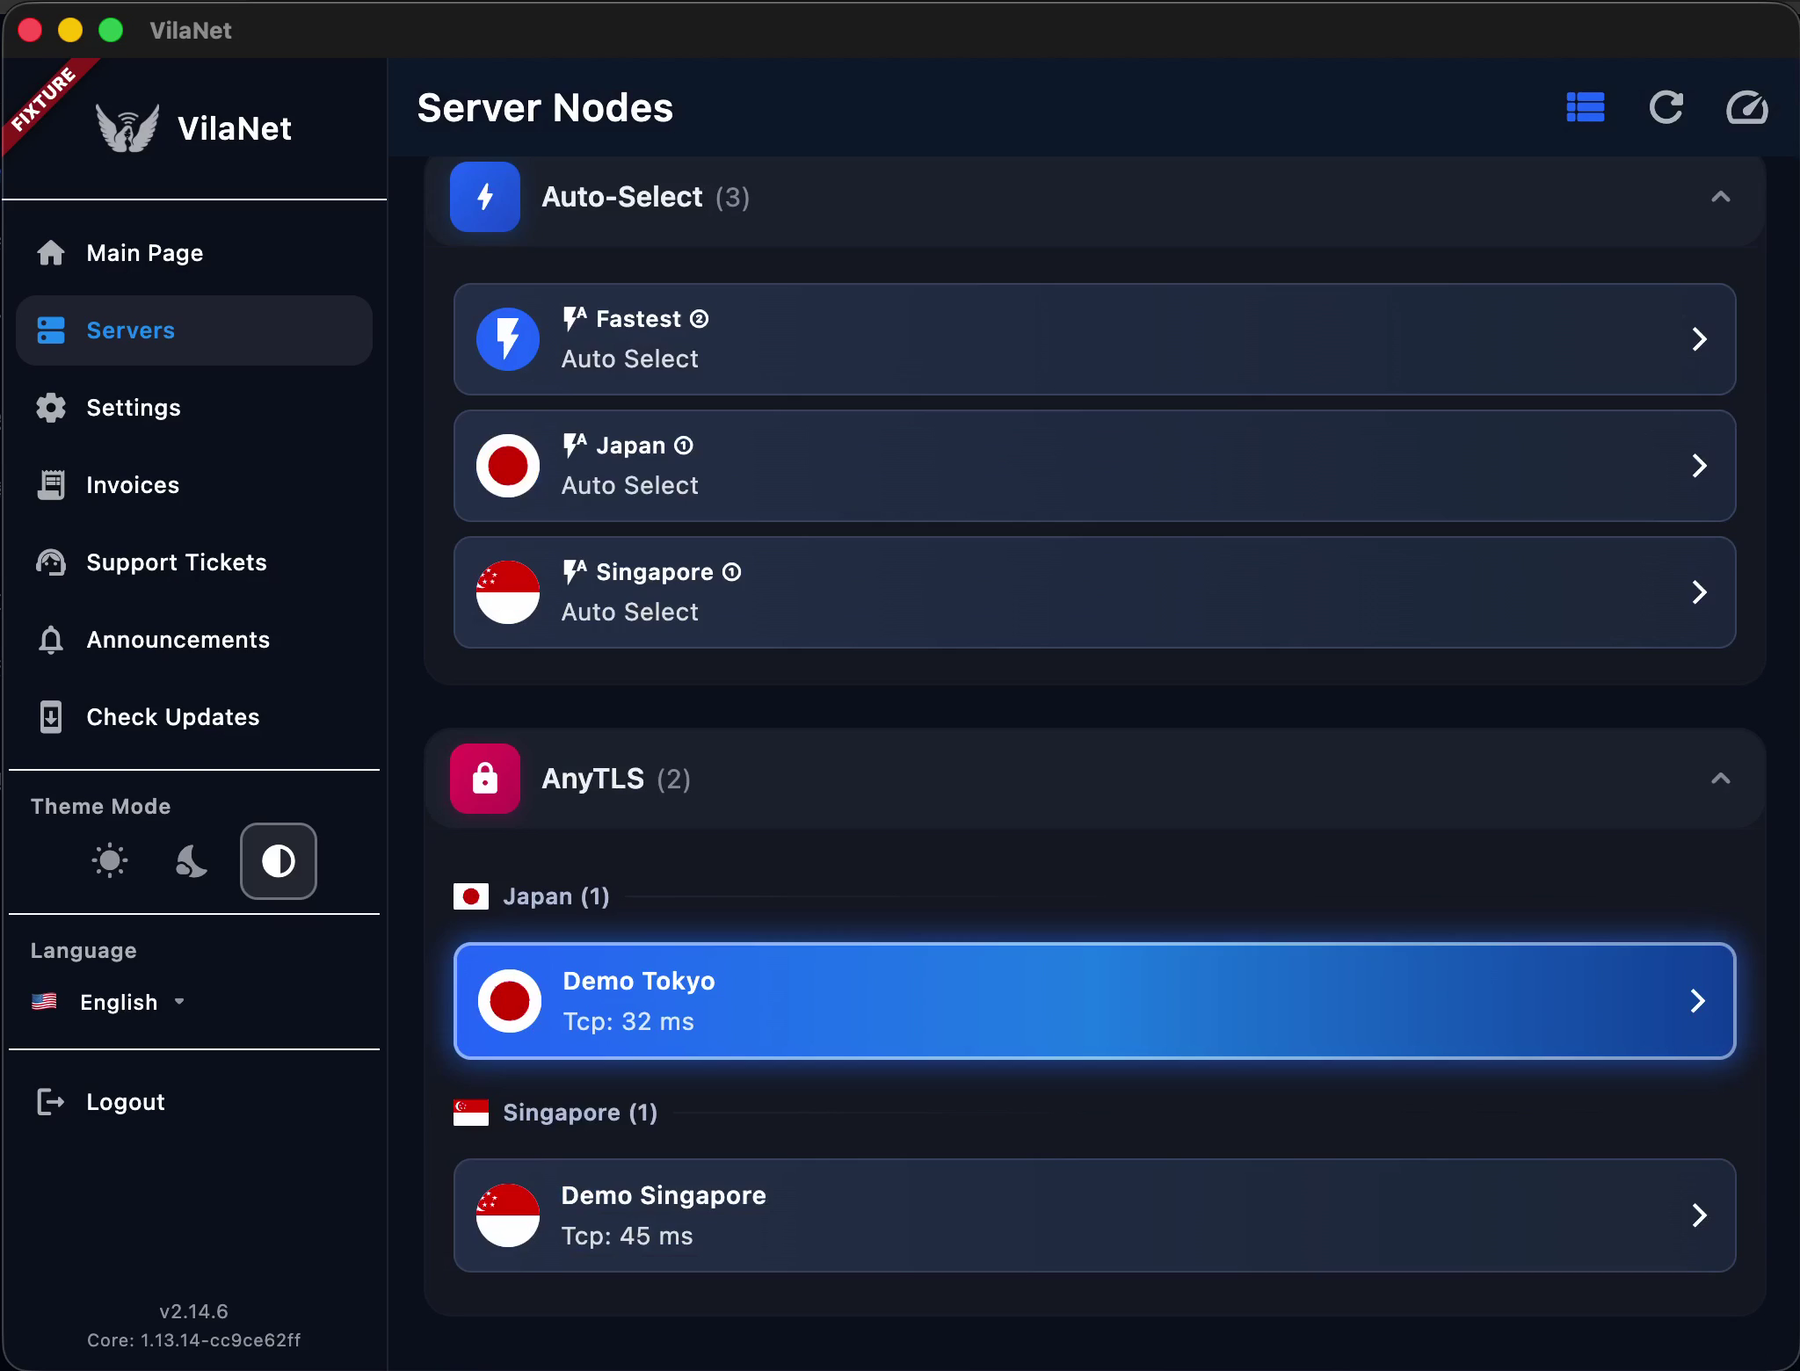
Click a node (here
Demo Singapore,Tcp: 45 ms). The page returns to the main page by itself — there is nothing to go back to.Check the selection on the main page. The server card now reads
Demo Singapore, but the status is still Disconnected — selecting a node is not connecting.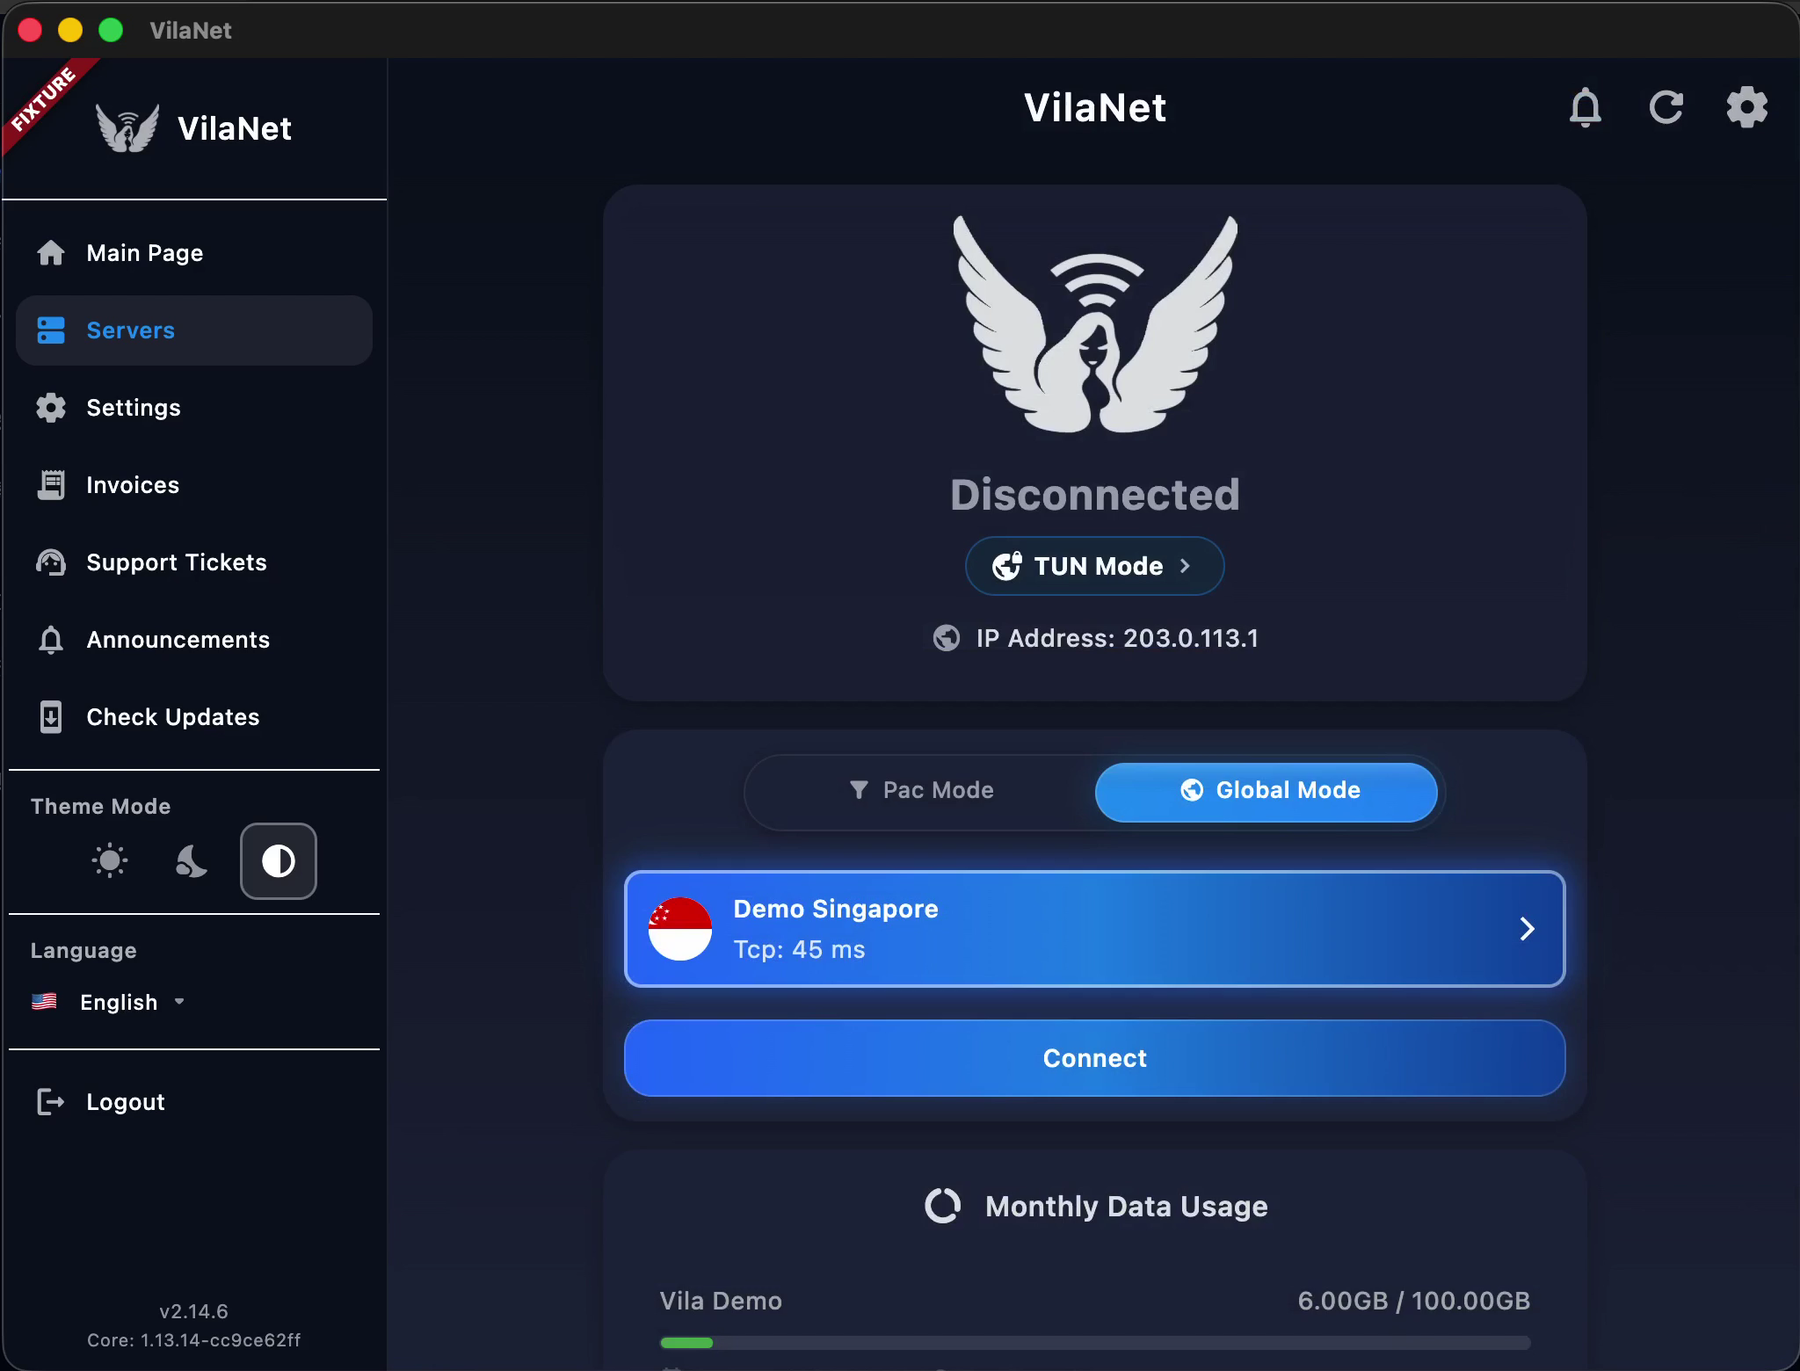
Click Connect. The status first turns orange and reads Connecting, then turns blue and reads Connected; at the same time the wing logo above it turns blue and the button becomes a red Disconnect.
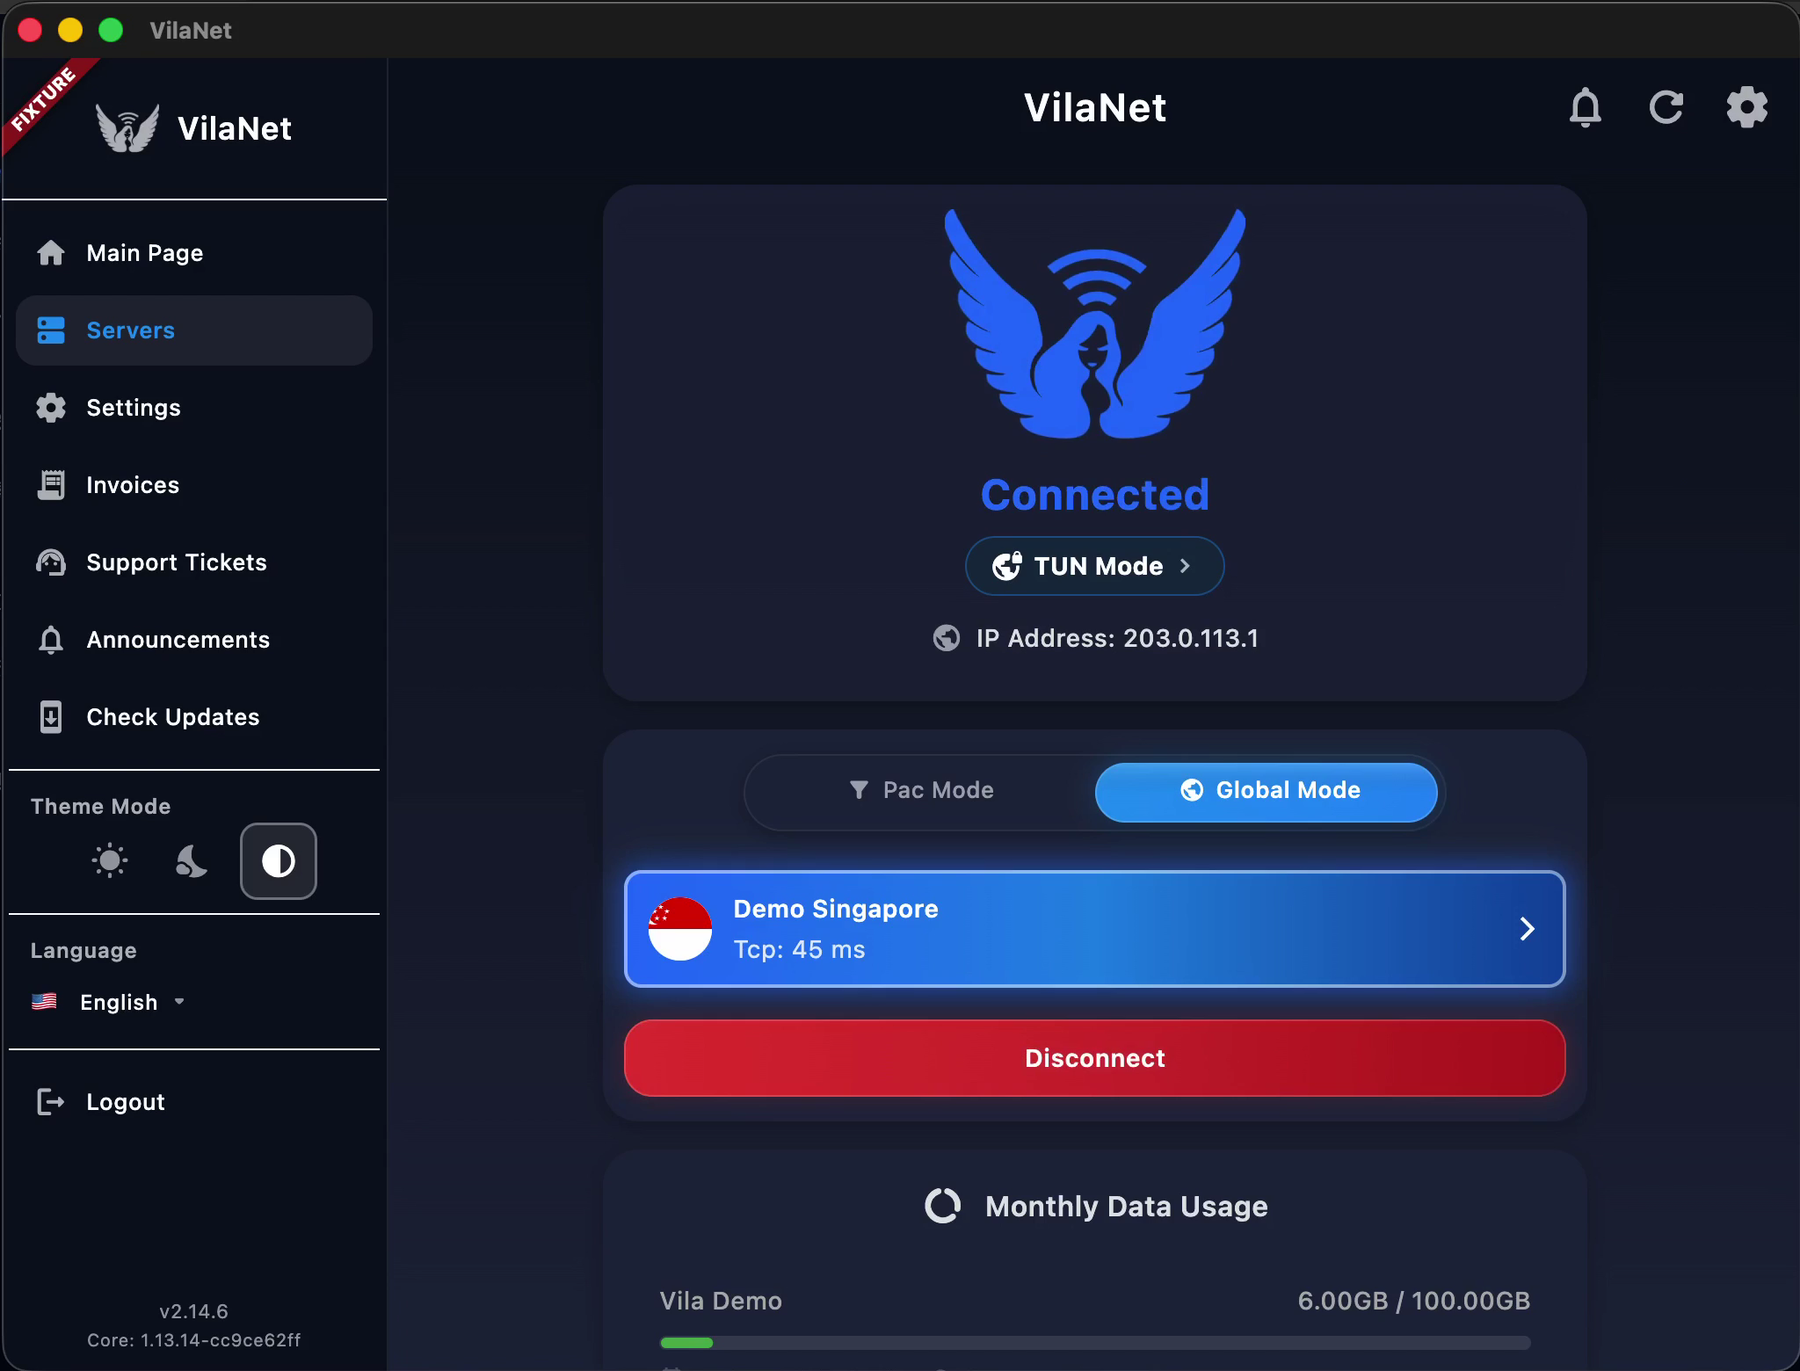
Disconnect. Click the red Disconnect. The status passes through an orange Disconnecting, returns to Disconnected, and the button turns back into the blue Connect.
How to tell it really connected
Look only at the status block in the middle of the main page. Three things change together:
| Not connected | Connected | |
|---|---|---|
| Status text | Disconnected (grey) | Connected (blue) |
| Wing logo above it | White | Blue |
| Button below | Connect (blue) | Disconnect (red) |
⚠️ Do not judge the connection state by the colour of the server card. The selected server card is always highlighted blue — including when you are not connected. The "Disconnected" and "Connected" screenshots above are the same blue
Demo Singaporecard: the card is identical, and only the status text, the logo colour and the button change.The Server Nodes list carries no "connected" marker either. The blue highlight there also means only "currently selected", and a node's second line is its latency (for example
Tcp: 45 ms), not its connection state. To check the connection state, go back to the main page.
Both intermediate states (the orange Connecting and the orange Disconnecting) last about a second, so not catching them is normal.
No nodes visible on the Server Nodes page means the protocol groups are collapsed by default — click the group header to expand. That is not a fault. Picking a node does not connect you: back on the main page you still have to click Connect.
The narrow-window layout
VilaNet switches layout on window width. A wide window has the permanent left rail (Main Page, Servers, Settings, Invoices, Support Tickets, Announcements, Check Updates); narrow the window and the same entries move behind a ☰ button at the top left, with identical steps. Phones are always the narrow layout. Logout sits at the bottom of the left rail in the wide layout and at the bottom of the ☰ drawer in the narrow one; it opens a dialog titled Confirm asking "Are you sure you want to logout?", where Confirm signs you out to the login screen and Cancel returns.
Settings and your account
Settings has four icon tabs. The first holds the VPN package selection and Connection Mode (TUN Mode or Proxy Mode), plus Auto-Reconnect and the local-proxy options. The last (right-most) tab is the account tab: it shows Account Setting with your sign-in email, and About.
5. Confirm that it works
- Leave VilaNet open for a few seconds and confirm it remains Connected.
- Open a browser and load two familiar HTTPS websites.
- Return to VilaNet and confirm it still shows Connected.
The app status and working web traffic together are a stronger check than an IP-check website alone. See Confirm VilaVPN is working for the complete verification steps.
If something goes wrong
The app will not install or open
- Confirm the Mac is running macOS 12 or later.
- Delete the incomplete installer and download it again from an official link above.
- For the DMG, confirm VilaNet was copied to Applications before opening it.
- If macOS reports an unexpected developer or security warning, do not bypass it. Preserve the exact message and contact support.
The VPN permission was denied
- Open the system-extension approval location listed in step 7 and check for a pending VilaNet approval.
- Approve only the VilaNet component, then return to the app and select Connect again.
- If no approval is available, preserve the error message before reinstalling.
Login or connection fails
- Confirm the email address has no extra spaces and the subscription is active.
- Confirm ordinary internet access works while VilaNet is disconnected.
- Try Auto Select once.
- Record the exact error and preserve diagnostics before changing advanced settings or reinstalling.
- Continue to Cannot sign in or Cannot connect.
Next step
Learn how to choose a specific server, or keep Auto Select enabled for normal use.
Was this page helpful?